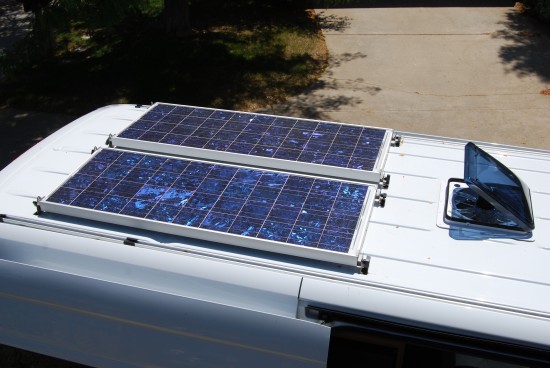
I wanted my new Sprinter RV conversion to be much “greener” than my old Dodge Tradesman camper van – not just for my conscience, but to be more self-sufficient, and hopefully cheaper and less complicated in the long run. It made sense – given that we wanted to “boondock” often, camping out by climbing crags and other wilderness/national forest areas where there would be no power hookups and no fuel sources nearby – that solar photovoltaic panels would be one of the power sources on the new rig.
I did my solar training at Solar Energy International in Carbondale and Paonia, CO. SEI is one of only two places in the US that does quality hands-on solar training. The systems we built were for rural properties, one mounted on a pole and the other on the roof of a barn. What does the top of an RV seem like as a solar site compared to these?
- Roof area – Our Sprinter RV has a lot of flat area on the roof – I figured I could mount four panels, if I saw fit.
- Surface temperature – Given that the panels would be flat and flush-mounted as low as possible to minimize drag, there’d be minimal air circulation under the panels, as the surface of the panels would be pretty hot most of the time, typically 90-120 degrees F, way over the 77F standard operating temp of the panels.
- Height – Our hi-roof Sprinter is nine feet tall, and I didn’t plan on adding a ladder, so I thought flip-up mounts would be an unnecessary complication, as I didn’t want to be up on the roof all the time flipping up the panels for maximum solar gain.
My first thought was to piece together a system from parts sold at the best price I could find. But there were plenty of considerations:
- I knew I would want a system with panels, monitor, charge controller, wiring, and RV-specific mounts
- I wanted to use deep-cycle sealed Absorbed Glass Mat (AGM) batteries, as opposed to the typical deep-cycle lead-acid “wet” cells often used in home installations. I planned on having the batteries in the van, with the advantage that provides of moderating temperature extremes so the batteries last longer, and didn’t want any chances of off-gassing, like lead-acid batteries do (even though I did plan on a sealed battery box, vented to the outside).
- I wanted a battery charge controller with Maximum Power Point Tracking (MPPT) – charge controllers using this feature can produce up to 30% more power at peak charging times than their non-MPPT brethren, according to some studies.
- I wanted an integrated system monitor that would display amps coming in from the solar panels and battery state of charge – if we were going to rely on solar as primary power, we’d have to manage our consumption, and know how much juice was left in the batteries. Charge controllers will often not function below a certain voltage, so if your batteries are drained too deeply, the panels won’t be able to charge them via the controller, you’ll have to use a plug-in battery charger or similar tools.
So I looked around – first at panels, then controllers, then other parts. I decided it would take too long to put this together piece by piece – if I could find an RV-specific system, any additional cost might equal time saved in integrating the pieces. A Web search for “RV solar systems” still led to too many choices, but looking closely at the results, I could see that many of these were just systems designed as trickle charging for RVs with house batteries, not for primary power – the controllers offered weren’t good quality (didn’t offer MPPT), prices were exorbitant for the charging potential of these little kits, some included thin film panels, which wouldn’t last. I also didn’t need an inverter or DC disconnects included in many of the more expensive kits, as I was planning on running a 12-volt DC system, no AC power, for the sake of simplicity and cost.
Finally I found AM Solar, and realized that one of their systems was just right for our use. Why?
- The SunRunner AM100-30DR System included all the pieces I would need: panels, mounts, rocker feet for an RV roof, charge controller, full wiring harness and a nifty combiner box to simplify the wiring drop through the roof into the van
- The solar panels looked like good-quality polycrystalline cells, but also custom-built with an RV-specific feature: they have 44 cells in the same area as the standard 36 cells in almost all other solar panels, Given this, the overtemped panels on the Sprinter RV roof would still generate close to the same amount of current as the 77F 36-cell panels on a house installation, with the breeze flowing underneath them
- Their HPV-30DR controller offered MPPT for maximum power
- Their solar monitor offered the info I wanted
- Their system info documents and wiring diagrams were excellent (given that I was going to have the conversion guys do the install, and they had never done a solar system before, I knew I would be supplying drawings if anything was unclear)
- The price was better than almost any of the other kits I had seen, for this amount of charging potential and quality of system
So we chose the AM Solar kit, but I still needed to figure out to how to store the juice from those panels – in my next post, I’ll talk about how I selected batteries and sized my system.


Comments on this entry are closed.